Record your FPV simulator with OBS Studio
Record your Liftoff races with OBS Studio to boost your FPV skills!

So you've purchased an FPV simulator (and hopefully a proper controller), now its time to put in some hours. One of the best way to make those practice hours count is to be able to study your stick control. If you've ever been moving fast in a sim race and missed a gate, you very well could have leaned a little on the yaw while back off the throttle. Since most simulators don't offer in-game recording, this guide will walkthrough using the popular open-source recording software OBS Studio to give you a consistent recording tool to watch those crucial playbacks.
Setting up OBS Studio
Why OBS Studio?
You might have thought why OBS studio? I'm not trying to stream a game, I just wanted a few minutes of recording. It's complexity is definitely a point against it. For this post, we're going to ignore all the streaming aspects and just focus on low-latency, efficient recording. Focusing on recording in OBS makes setup a bit faster and easier to everyone's benefit.
Download & configure OBS
- Head on over to download and install a copy of OBS studio for you preferred operating system:
https://obsproject.com/download - Once the installation completes, (depending on your operating system) you'll be greeted by the Auto-Configuration Wizard on first launch. You can click Cancel on the wizard because this guide covers those changes and more.
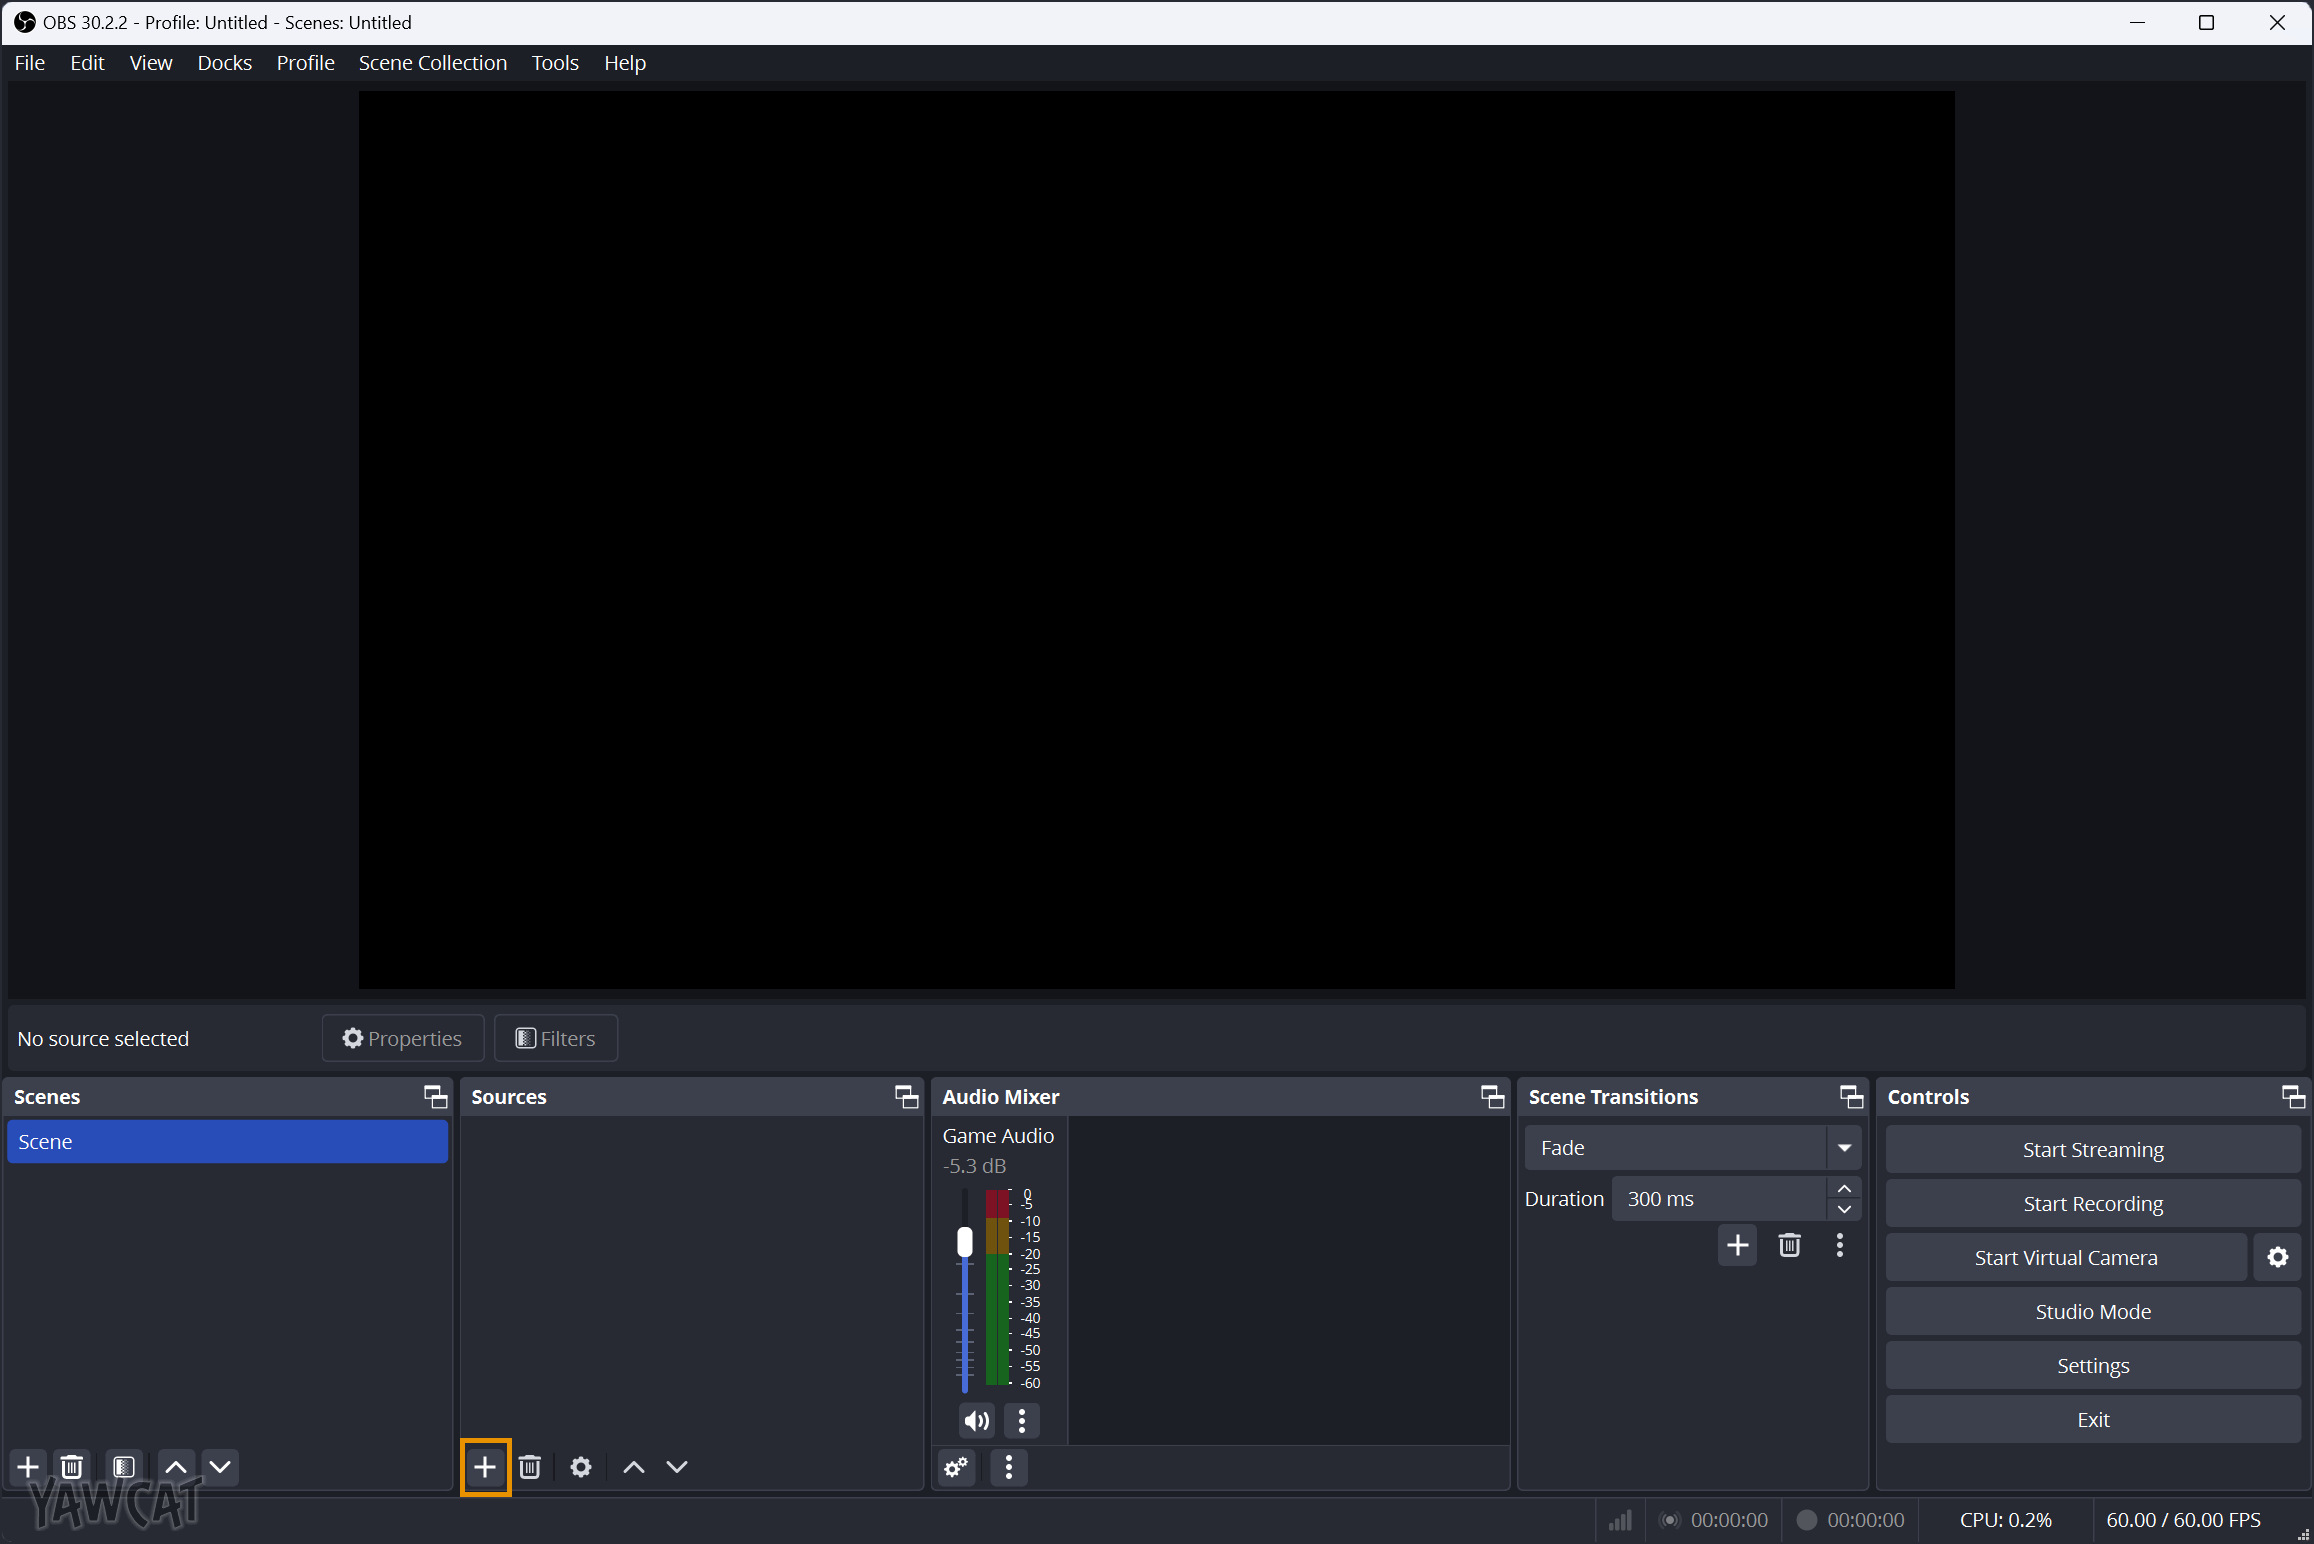
- Once you arrive at the OBS Studio window, let's take a look at the overall layout:
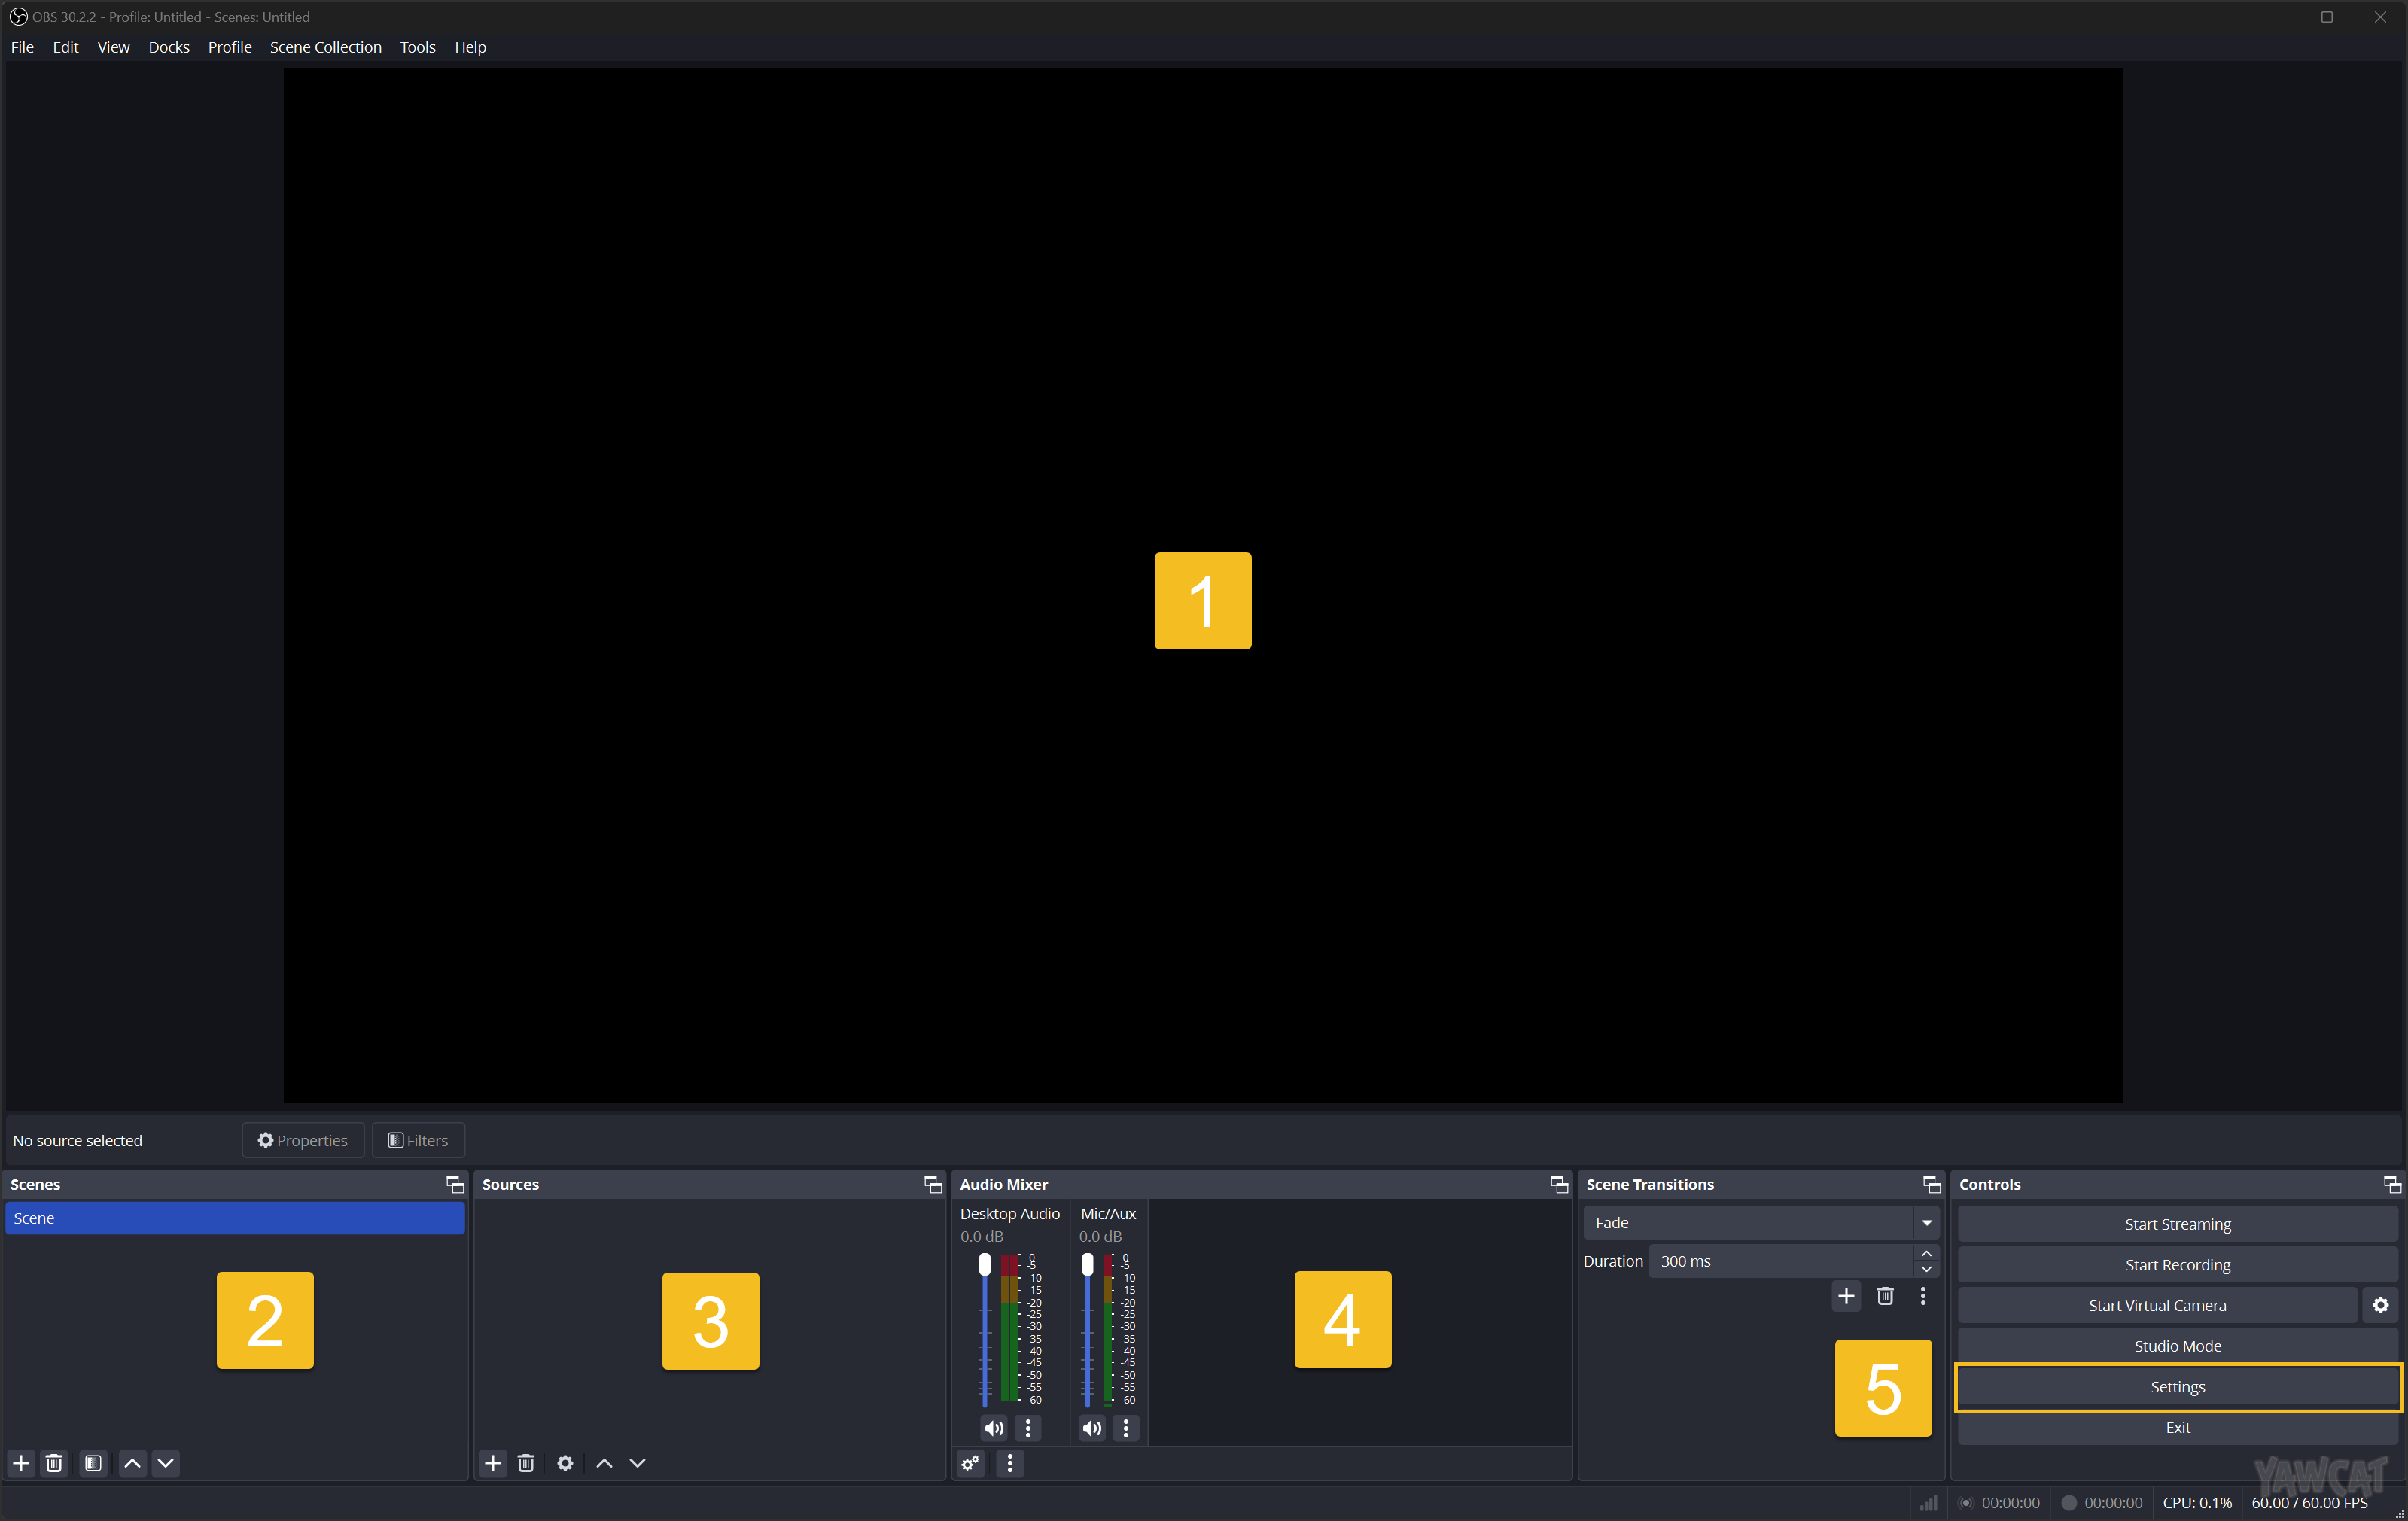
- Preview Window: Viewer for the target space to capture during recording
- Scenes Dock: Allows for multiply scene overlays (Primarily used for streaming)
- Sources Dock: Area to select a process/window for capture, e.g.: your flight sim
- Audio Mixer: Audio controls for recoding session
- Controls Dock: Quick access controls such as start/stop recording and OBS settings
- Now that know the window layout, let's open Settings and click the Video tab in the sidebar
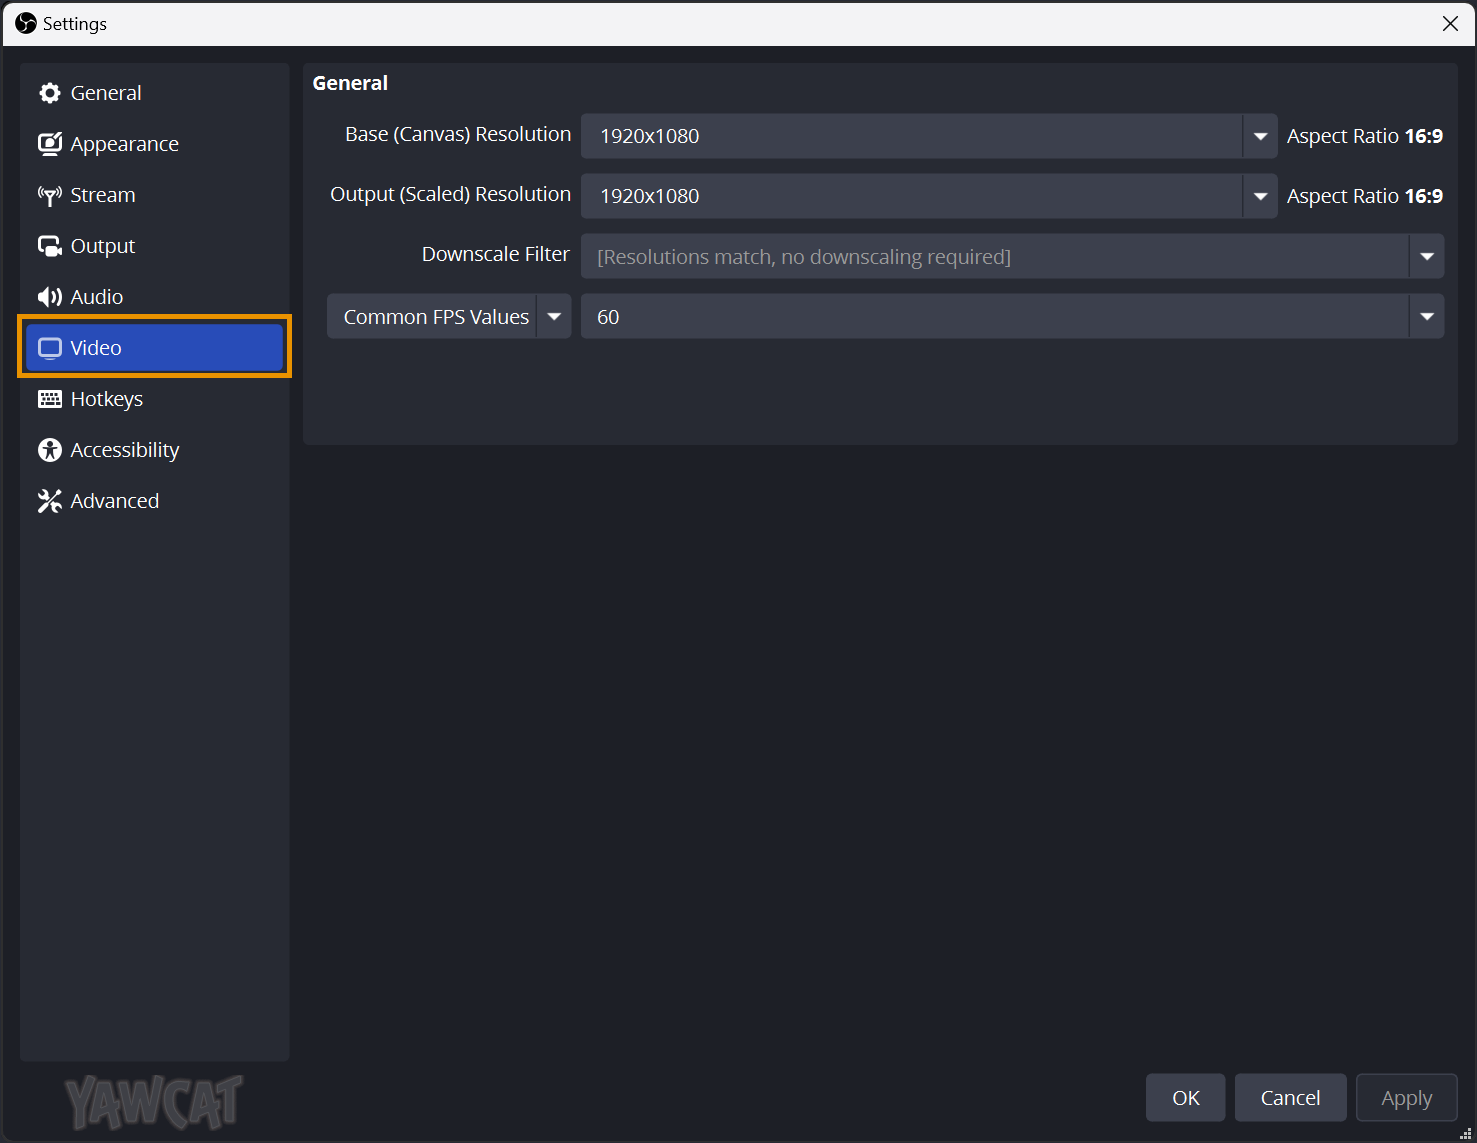
- Next steps is to update these settings to record in 1080p:
- Base (Canvas) Resolution: 1920 x 1080
- Ouput (Scaled) Resolution:: 1920 x 1080
- Common FPV Value: 60
- Next step is to first click on the Output tab in the OBS Settings, and then second click on the Output Mode dropdown and select 'Advanced'
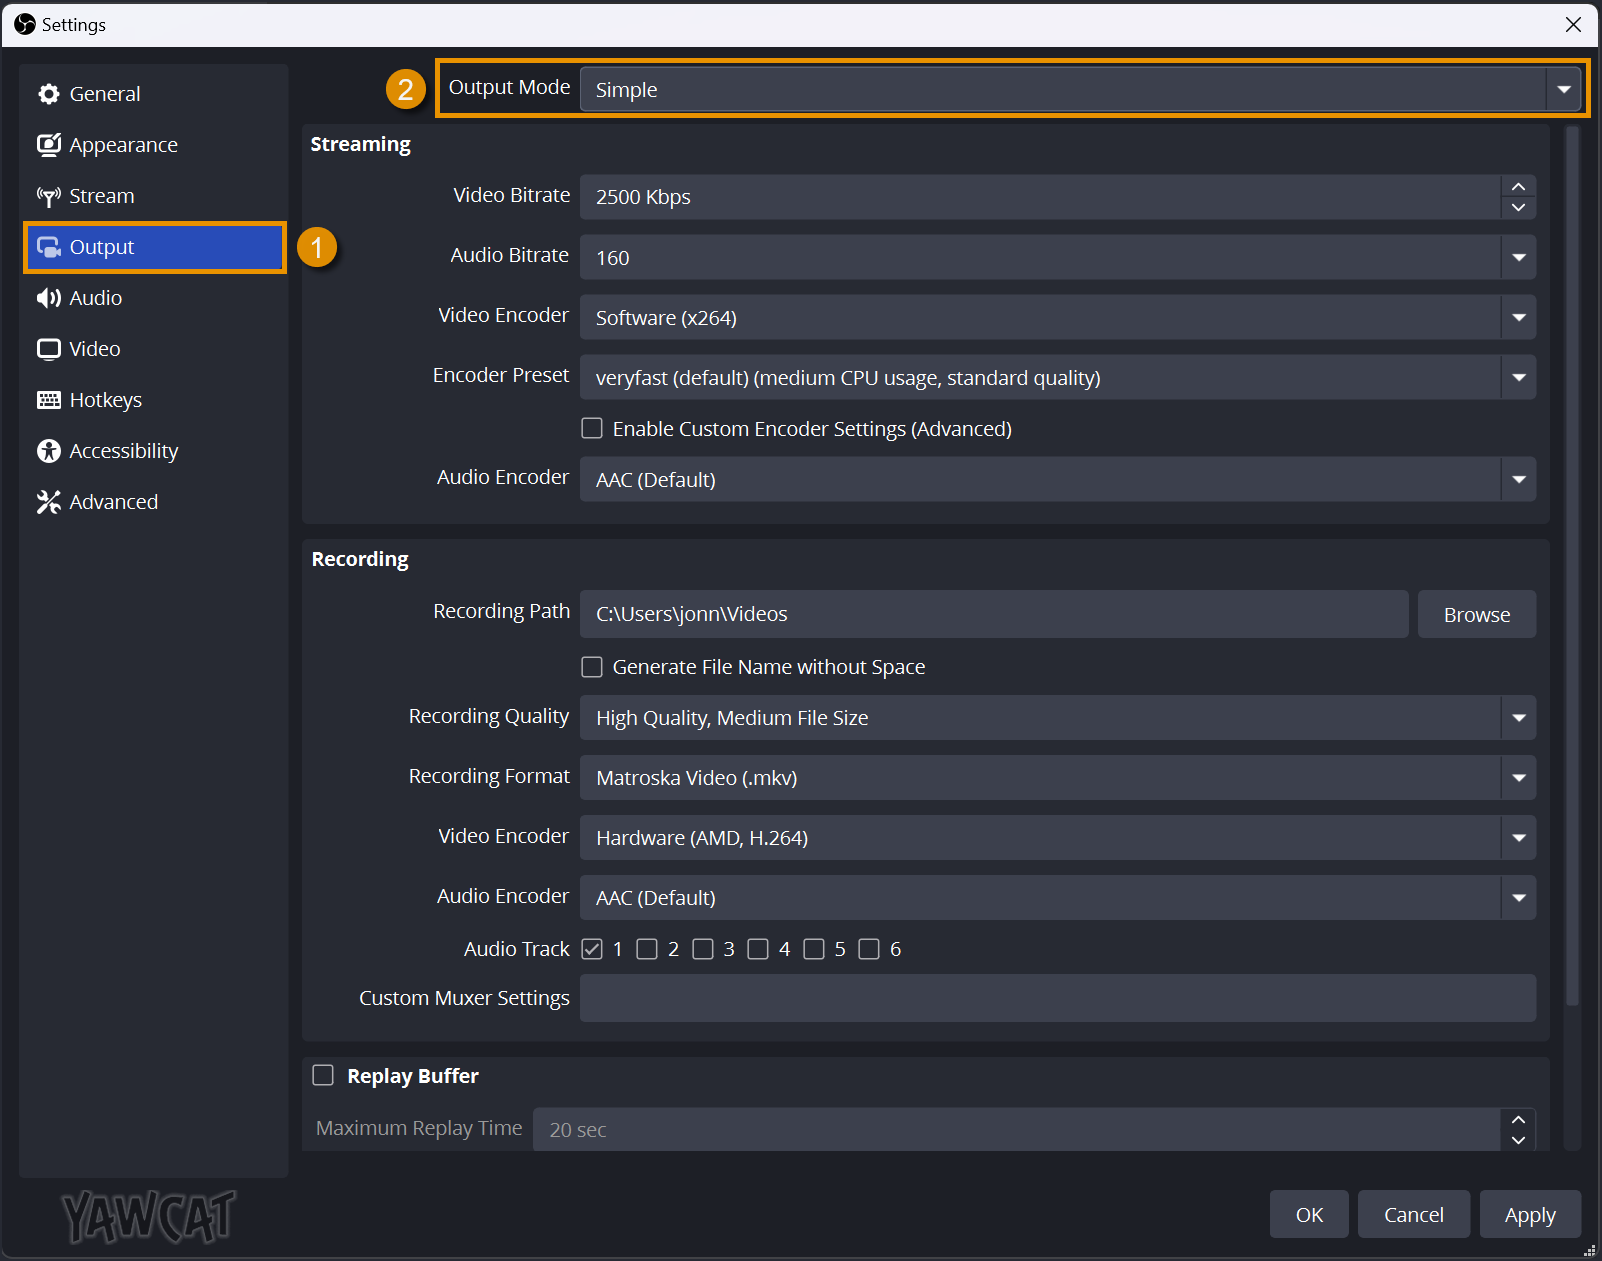
- The Output tab offers a lot of settings, many of which depend on your OS and graphics card. For this guide I'm going to focus on three options Windows + AMD GPU, Windows + Nvidia GPU, and MacOS with Apple Silcon—expand the section that matches your system and follow along:
Windows (AMD GPU)

Let's break down the individual settings into four parts:
- Recording
- Recording Path: File path where your videos are saved
- Recording Format: MPEG-4 (.mp4)
OBS will warn that an .mp4 will can be corrupted if you have a unrecoverable incident mid-record (e.g. power loss)—since these recording sessions will be on the shorter side, this is the best option for overall compatibility - Video Encoder: AMD HW AV1
During my testing, I found this to be the best overall option, your system may differ so feel free to experiment here - Audio
- Audio Encoder: FFmpeg AAC
The default is what you want - Audio Track: Select 1
If you wanted separate audio channels for recording/streaming, this is where you would set it up. By selecting 1, only the simulator audio will be used during the record - Scaling
- Rescale Output:: Disabled or Bicubic
Start with disabled, if your input source was a much larger resolution then your output you would need scaling, but if you find your videos a little out of focus, switch this to Bicubic - Encoder
- Rate Control: CQP
This controls our output quality - CQ Level: 18
Lower the number higher the quality, higher the number better the performance—start at 18 and increase the value if your dropping frames while recording - Keyframe Interval: 0
Auto will work just fine - Preset: High Quality
YMMV but let's shoot for the best to start - Profile: main
Windows (NVIDIA GPU)
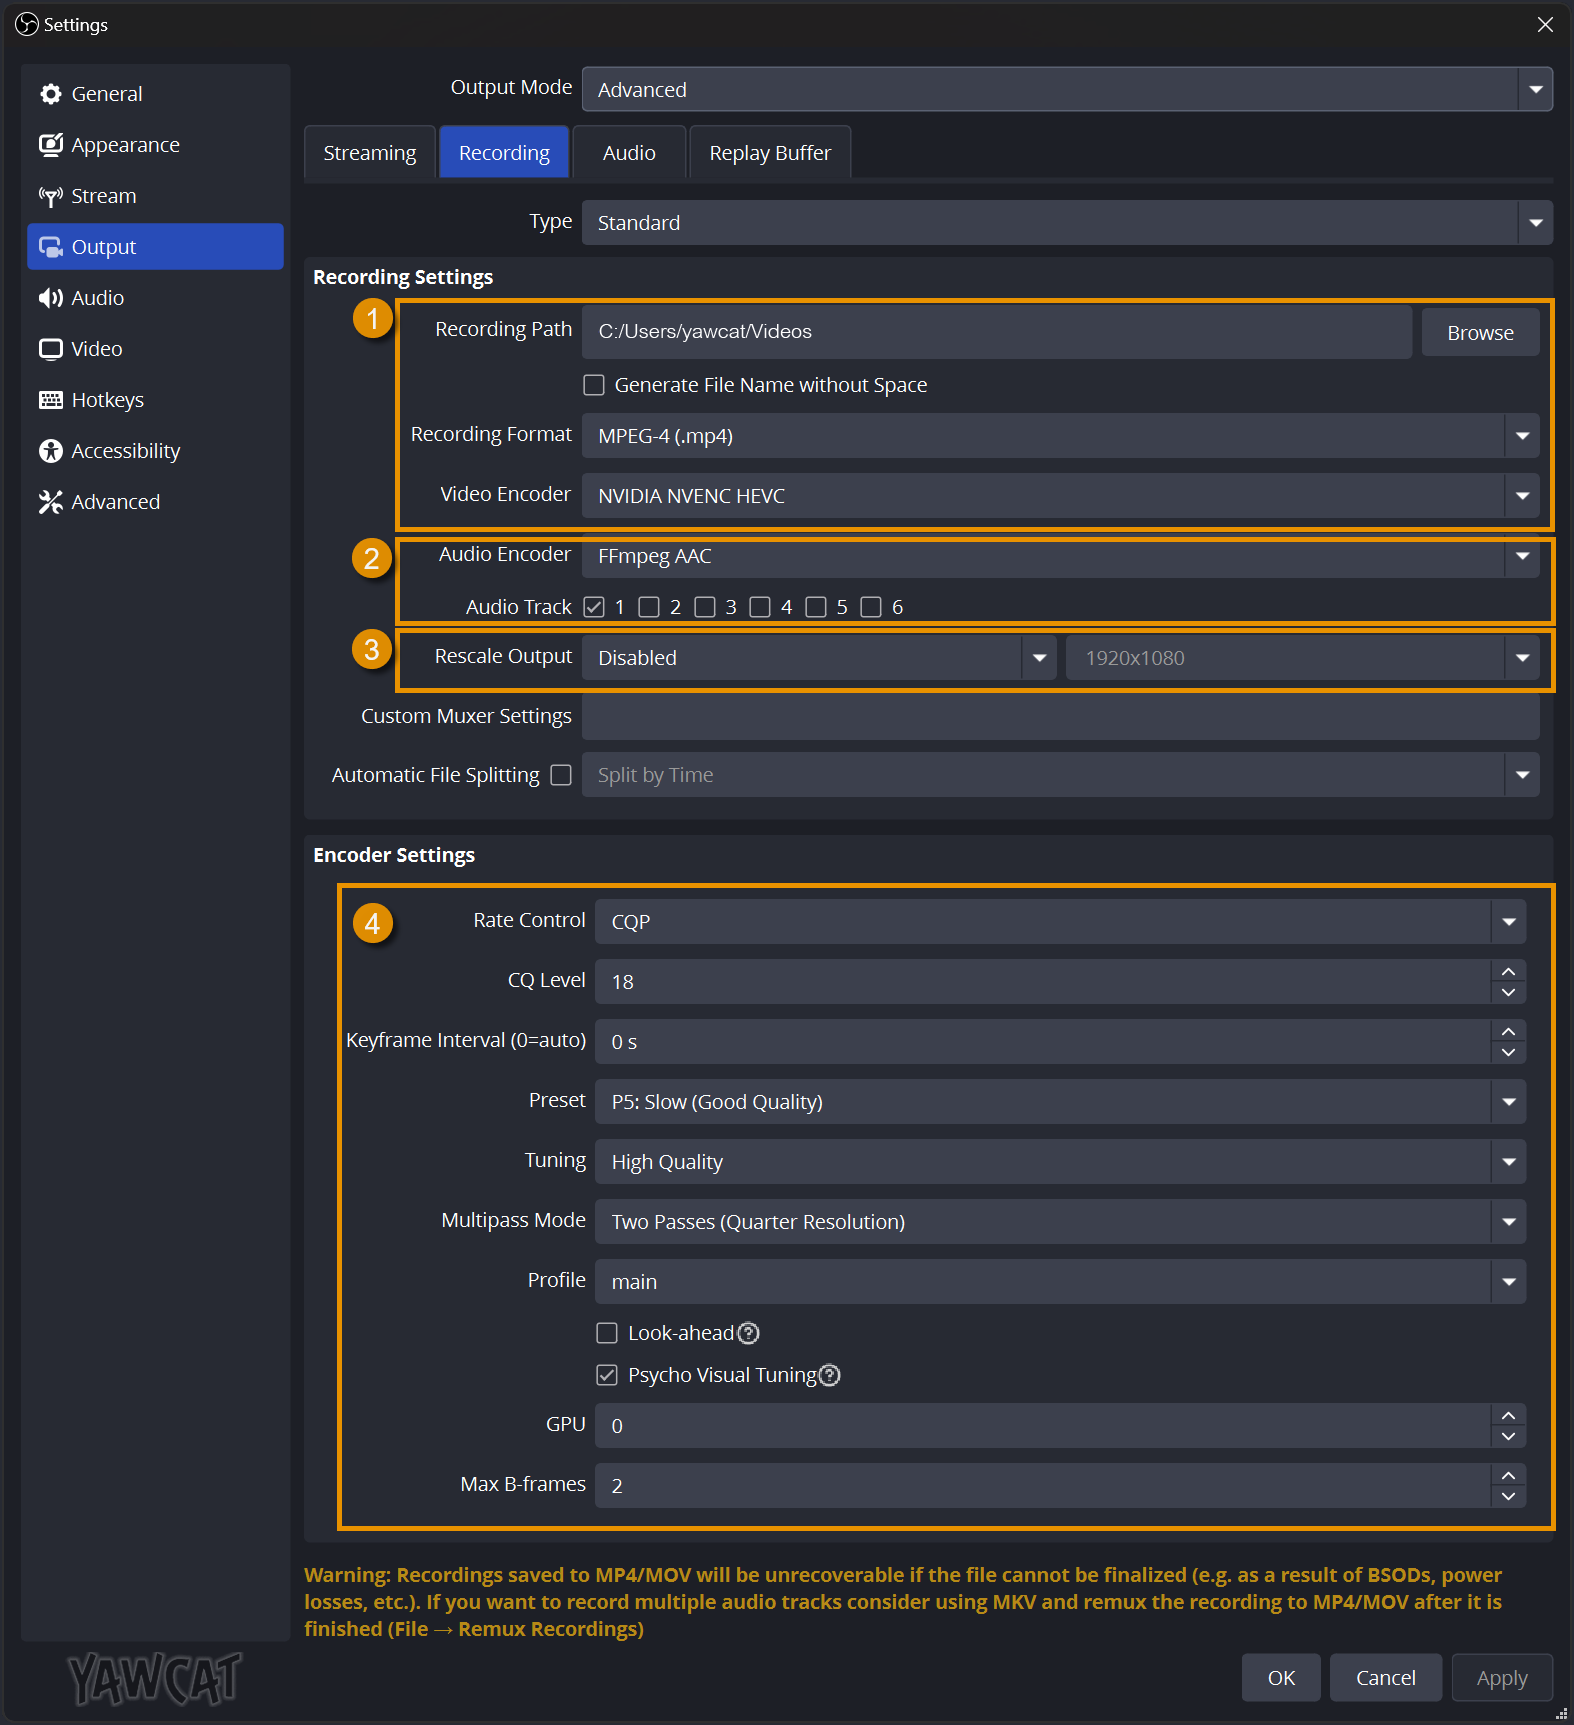
Let's break down the individual settings into four parts:
- Recording
- Recording Path: File path where your videos are saved
- Recording Format: MPEG-4 (.mp4)
OBS will warn that an .mp4 will can be corrupted if you have a unrecoverable incident mid-record (e.g. power loss)—since these recording sessions will be on the shorter side, this is the best option for overall compatibility - Video Encoder: NVIDIA NVENC HEVC
During my testing, I found this to be the best overall option, your system may differ so feel free to experiment here - Audio
- Audio Encoder: FFmpeg AAC
The default is what you want - Audio Track: Select 1
If you wanted separate audio channels for recording/streaming, this is where you would set it up. By selecting 1, only the simulator audio will be used during the record - Scaling
- Rescale Output:: Disabled or Bicubic
Start with disabled, if your input source was a much larger resolution then your output you would need scaling, but if you find your videos a little out of focus, switch this to Bicubic - Encoder
- Rate Control: CQP
This controls our output quality - CQ Level: 18
Lower the number higher the quality, higher the number better the performance—start at 18 and increase the value if your dropping frames while recording - Keyframe Interval: 0
Auto will work just fine - Preset: P5: Slow (Good Quality)
Adjust for performance - Tuning: High Quality
Adjust for performance - Multipass Mode: Two Passes (Quarter Resolution
Adjust for performance - Profile: main
- Psycho Visual Tuning: Checked
Recommended by NVIDIA - GPU: 0
- Max B-frames: 2
MacOS (Apple Silicon)
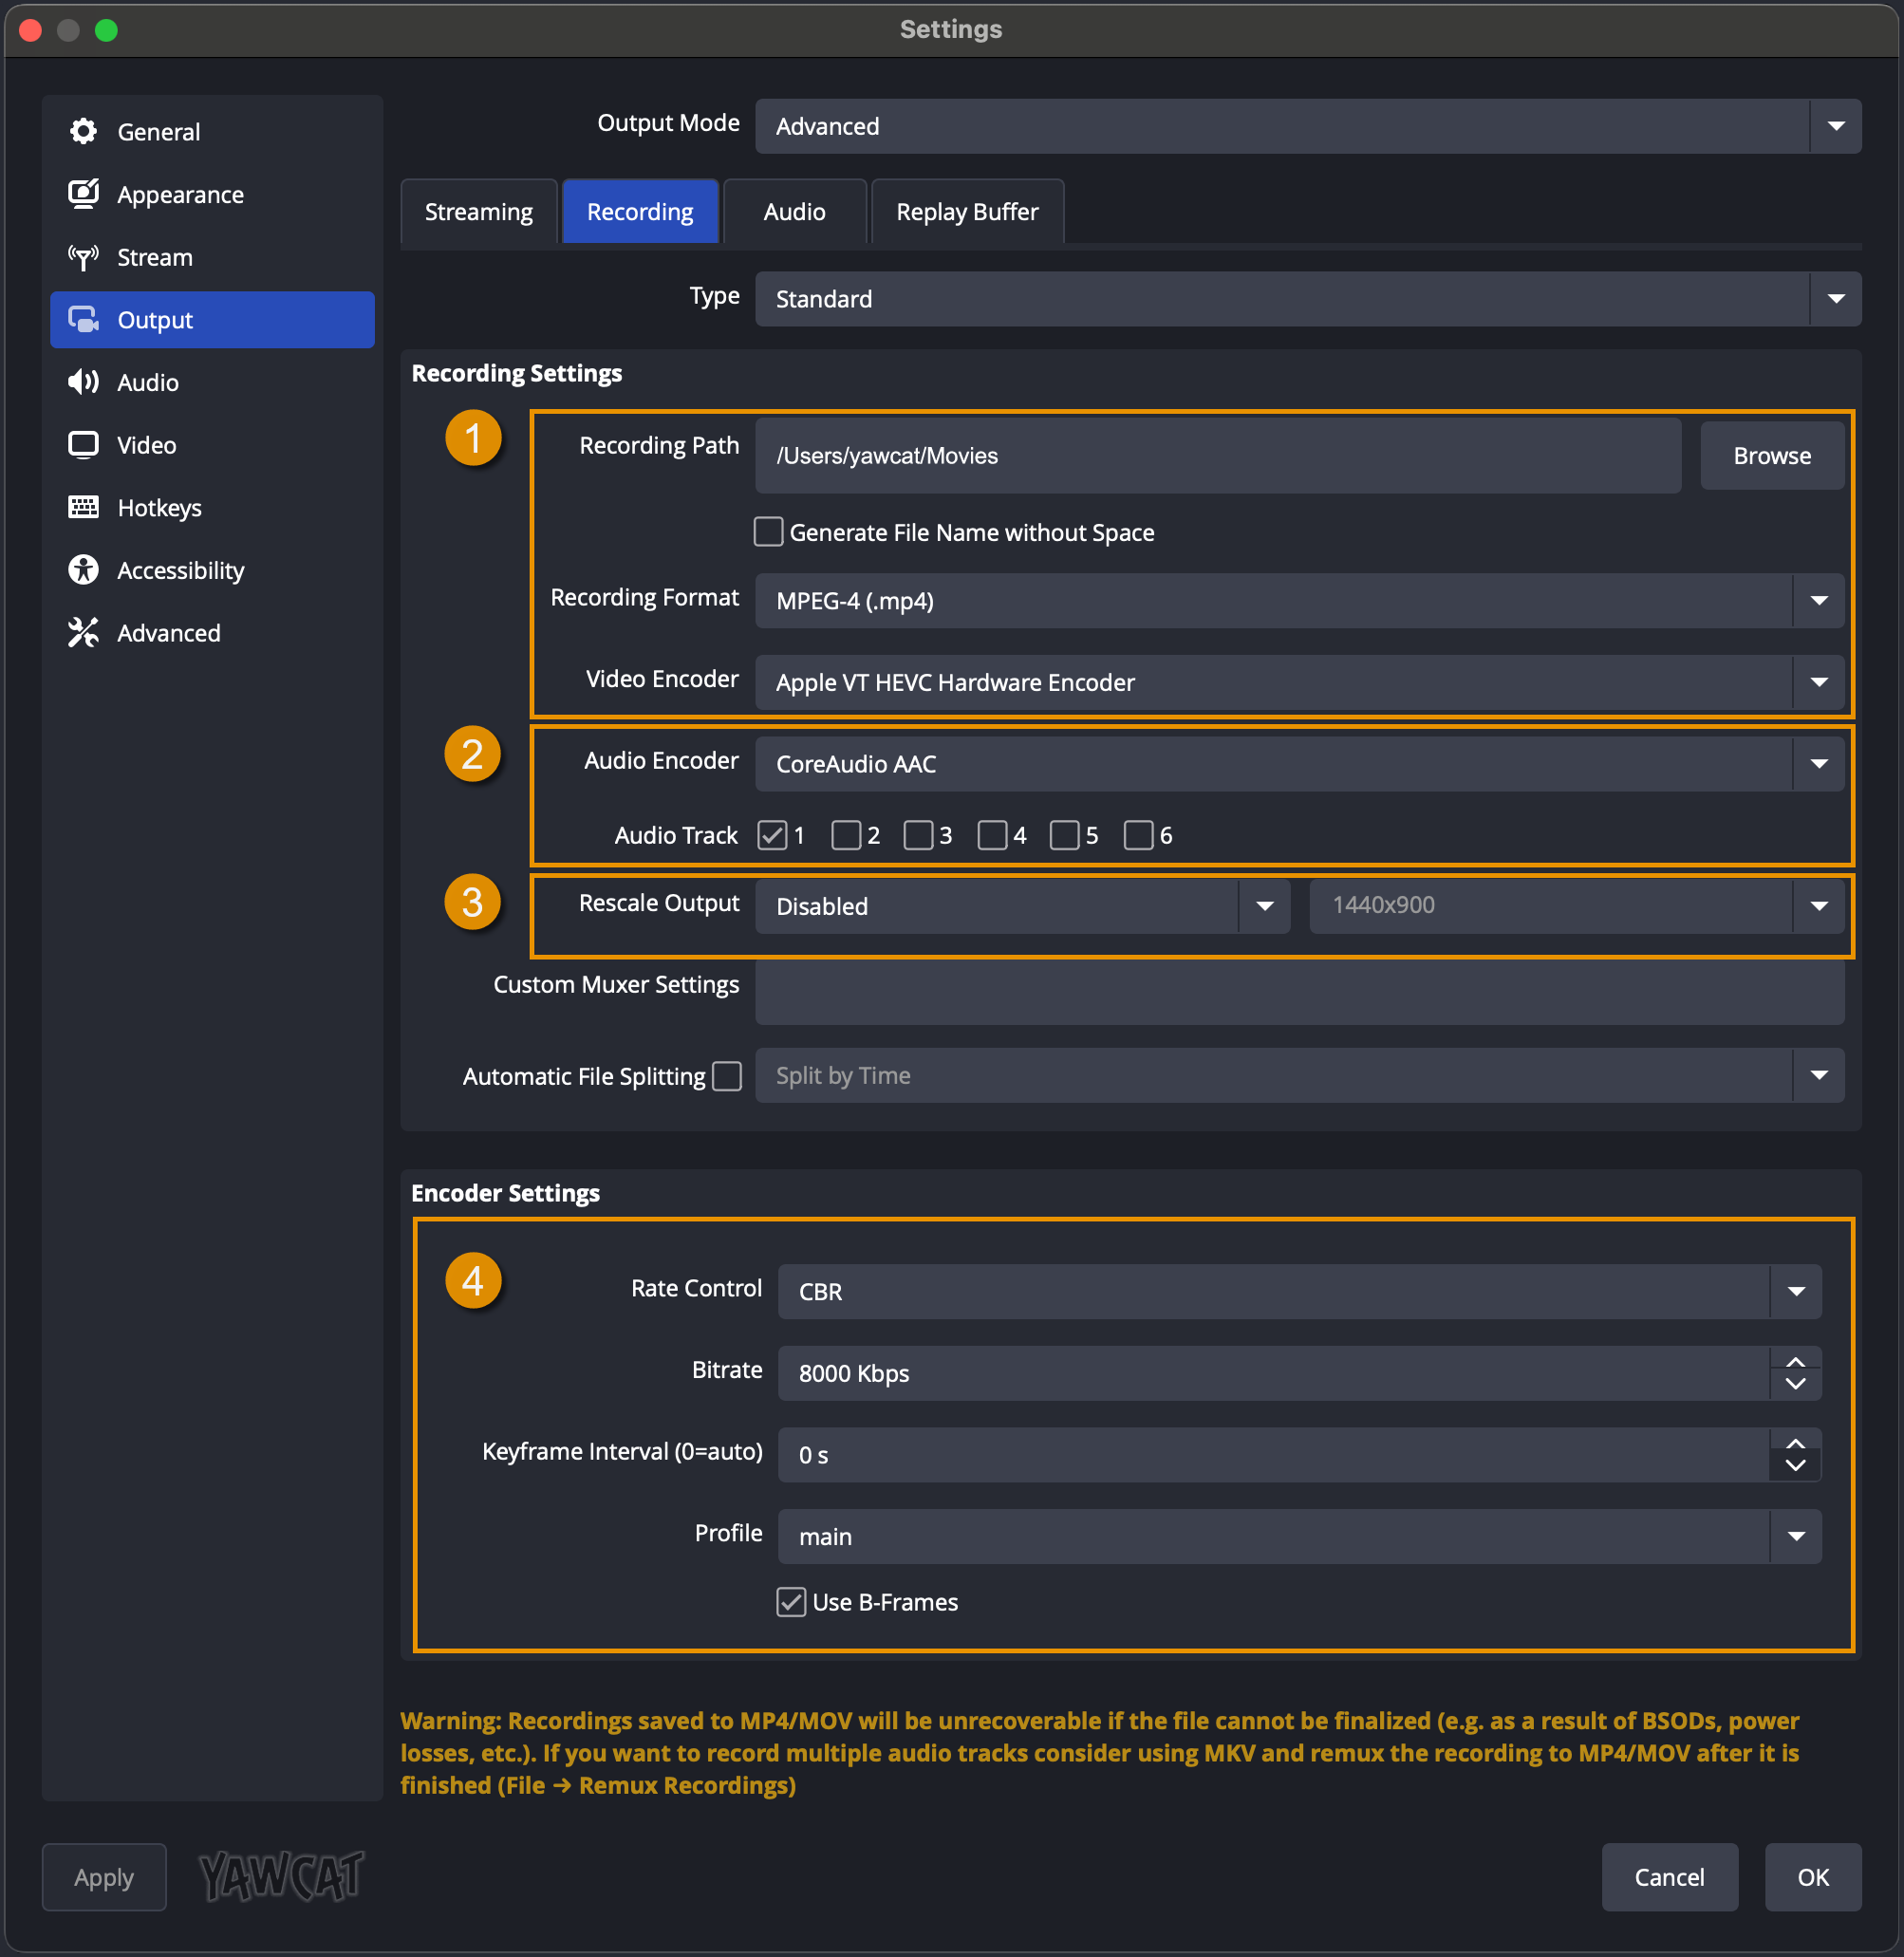
Let's break down the individual settings into four parts:
- Recording
- Recording Path: File path where your videos are saved
- Recording Format: MPEG-4 (.mp4)
OBS will warn that an .mp4 will can be corrupted if you have a unrecoverable incident mid-record (e.g. power loss)—since these recording sessions will be on the shorter side, this is the best option for overall compatibility - Video Encoder: Apple VT HEVC Hardware Encoder
During my testing, I found this to be the best overall option, your system may differ so feel free to experiment here - Audio
- Audio Encoder: CoreAudio AAC
The default is what you want - Audio Track: Select 1
If you wanted separate audio channels for recording/streaming, this is where you would set it up. By selecting 1, only the simulator audio will be used during the record - Scaling
- Rescale Output:: Disabled or Bicubic
Start with disabled, if your input source was a much larger resolution then your output you would need scaling, but if you find your videos a little out of focus, switch this to Bicubic - Encoder
- Rate Control: CBR
This controls our output quality - Bitrate: 8000 Kbps
Higher the value = higher the quality, decrease this value if your dropping frames while recording - Keyframe Interval: 0
Auto will work just fine - Preset: P5: Slow (Good Quality)
Adjust for performance - Profile: main
- Use B-frames: checked
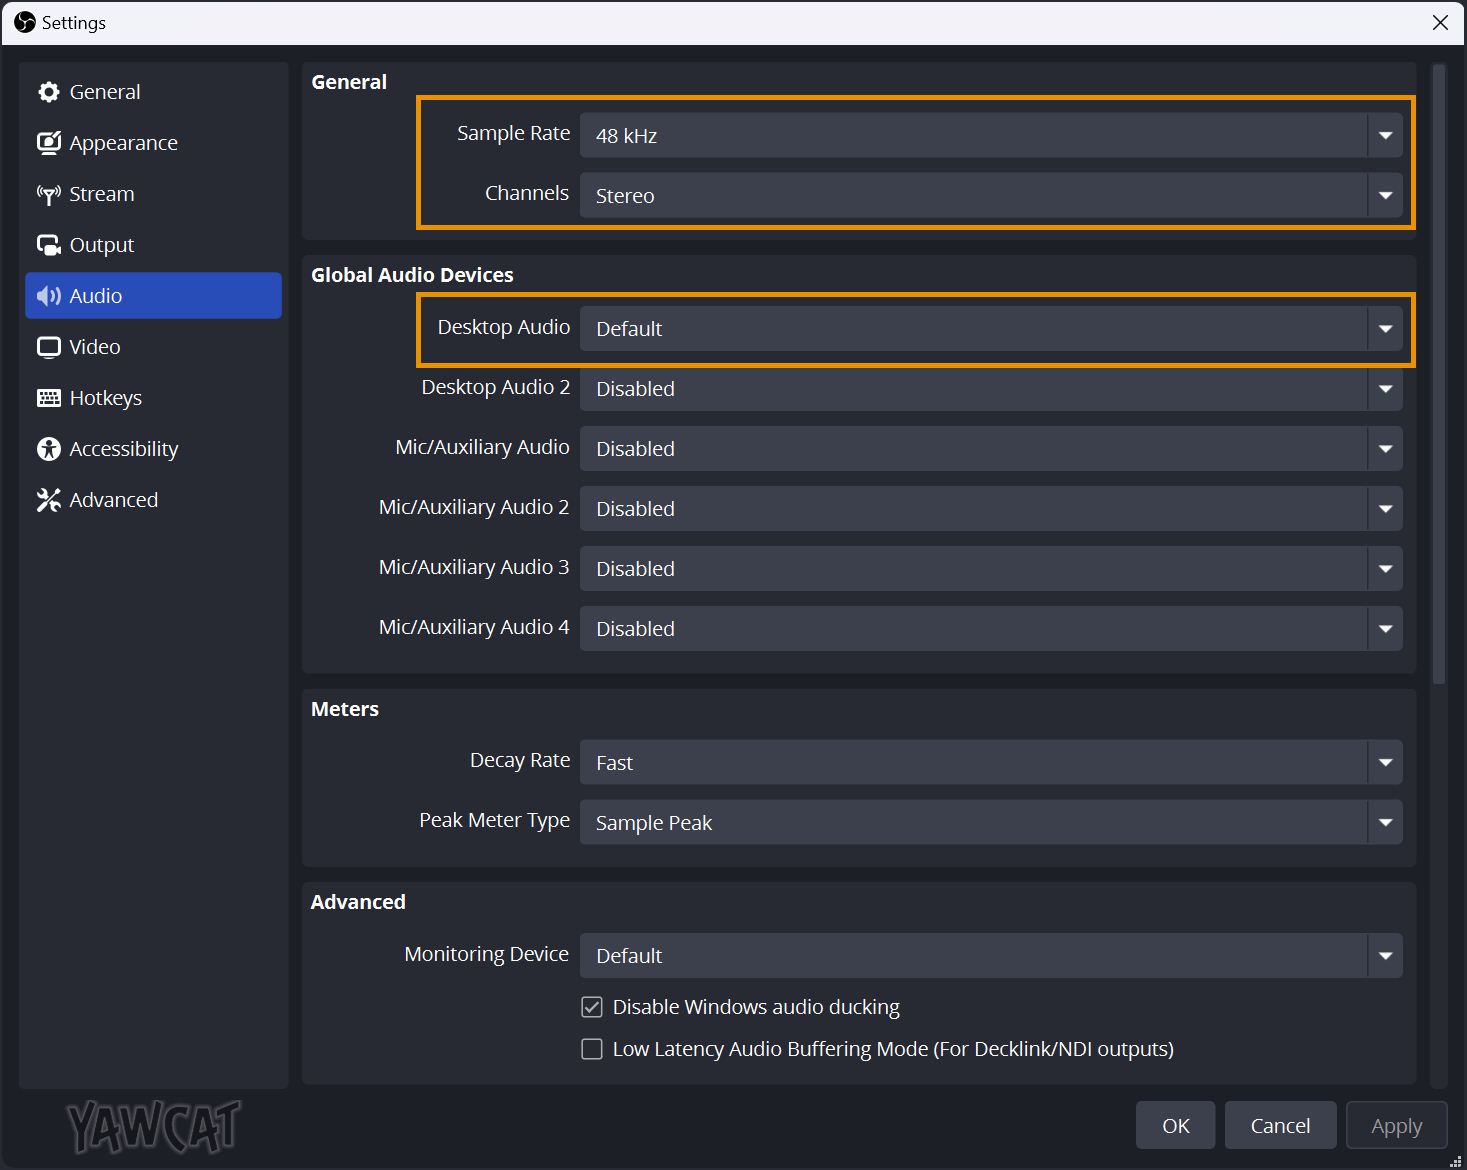
- Next click the Audio tab in the Settings sidebar and match these three fields:
- Sample Rate: 48 kHz
- Channels: Stereo
- Desktop Audio: Default
Recorded audio will be your default audio interface - All Other Audio Devices: Disabled
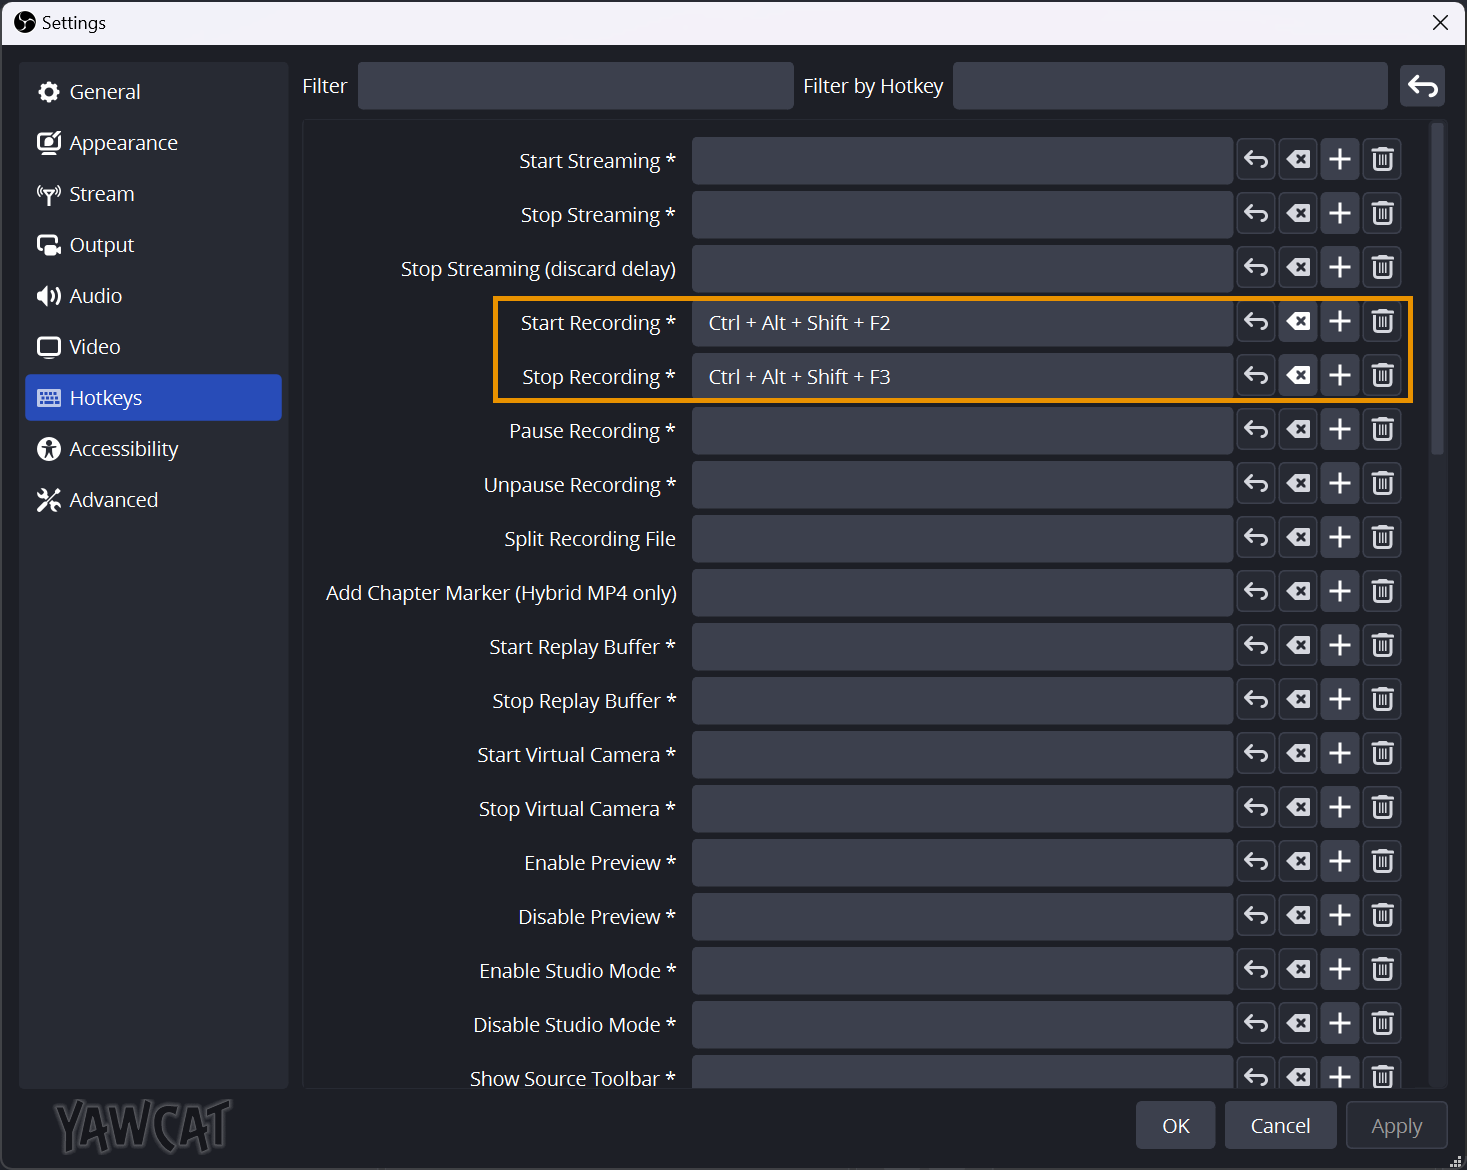
- To make sure you can quickly start a recording session, click the Hotkeys tab and add in a key combbination, I recommend the following:
- Start Recording: Control + Alt + Shift + F2
- Channels: Control + Alt + Shift + F3
Setup your Sources
Now OBS needs to know which application to capture. For this example we'll use Liftoff. To start, click the 'Add Source' button in the Sources Dock, then follow the setup steps for your OS:
OBS Sources Windows Setup
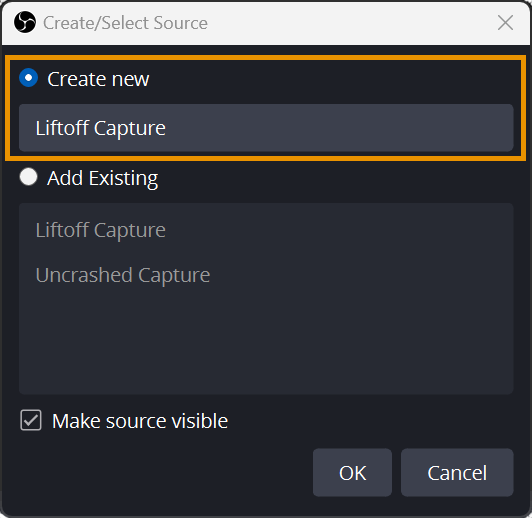
- Click 'Game Capture' in the menu
- Give the new source a name you'll remember, e.g.: 'Liftoff Capture'
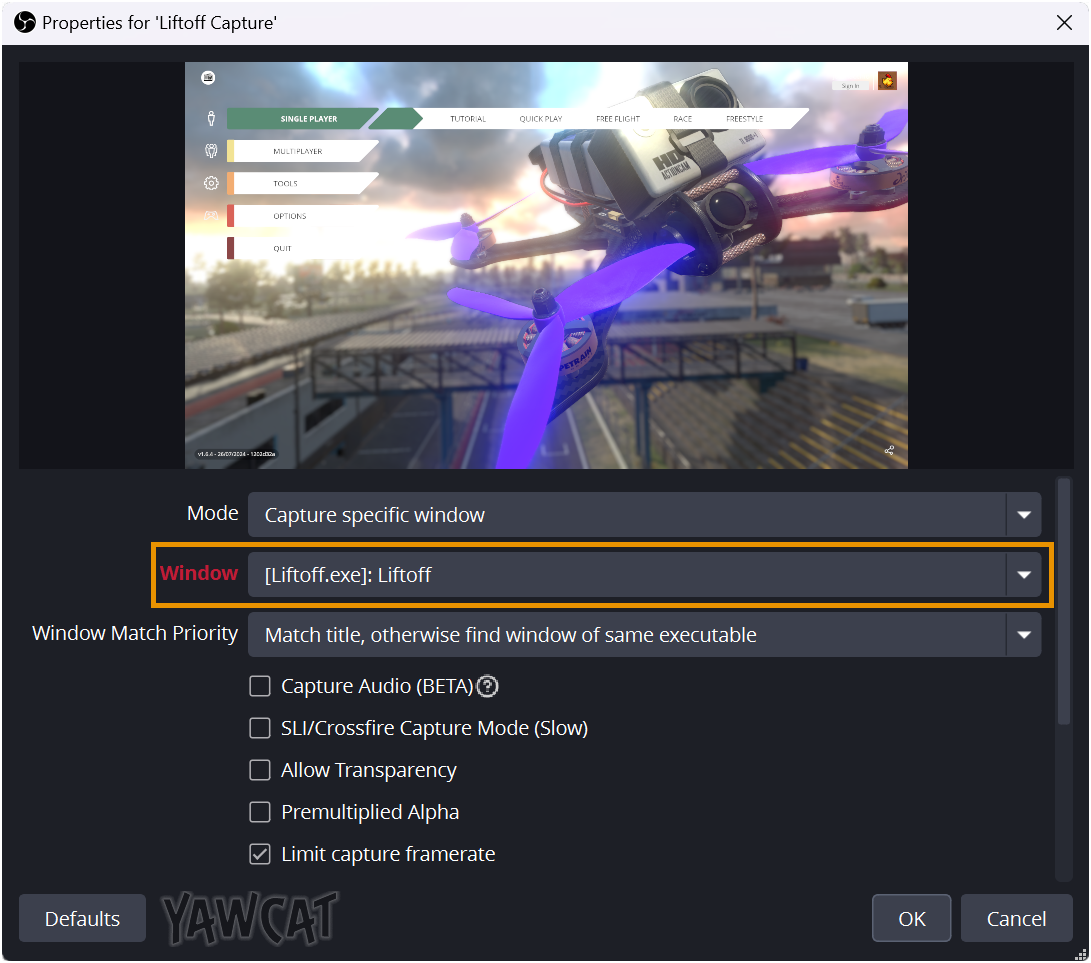
- You'll have to launch Liftoff for the next part, once it's up an running use the Alt + Tab shortcut to switch back to OBS.
- Click the Window dropdown and select [Liftoff.exe], click 'OK' to save.

OBS Sources Mac Setup
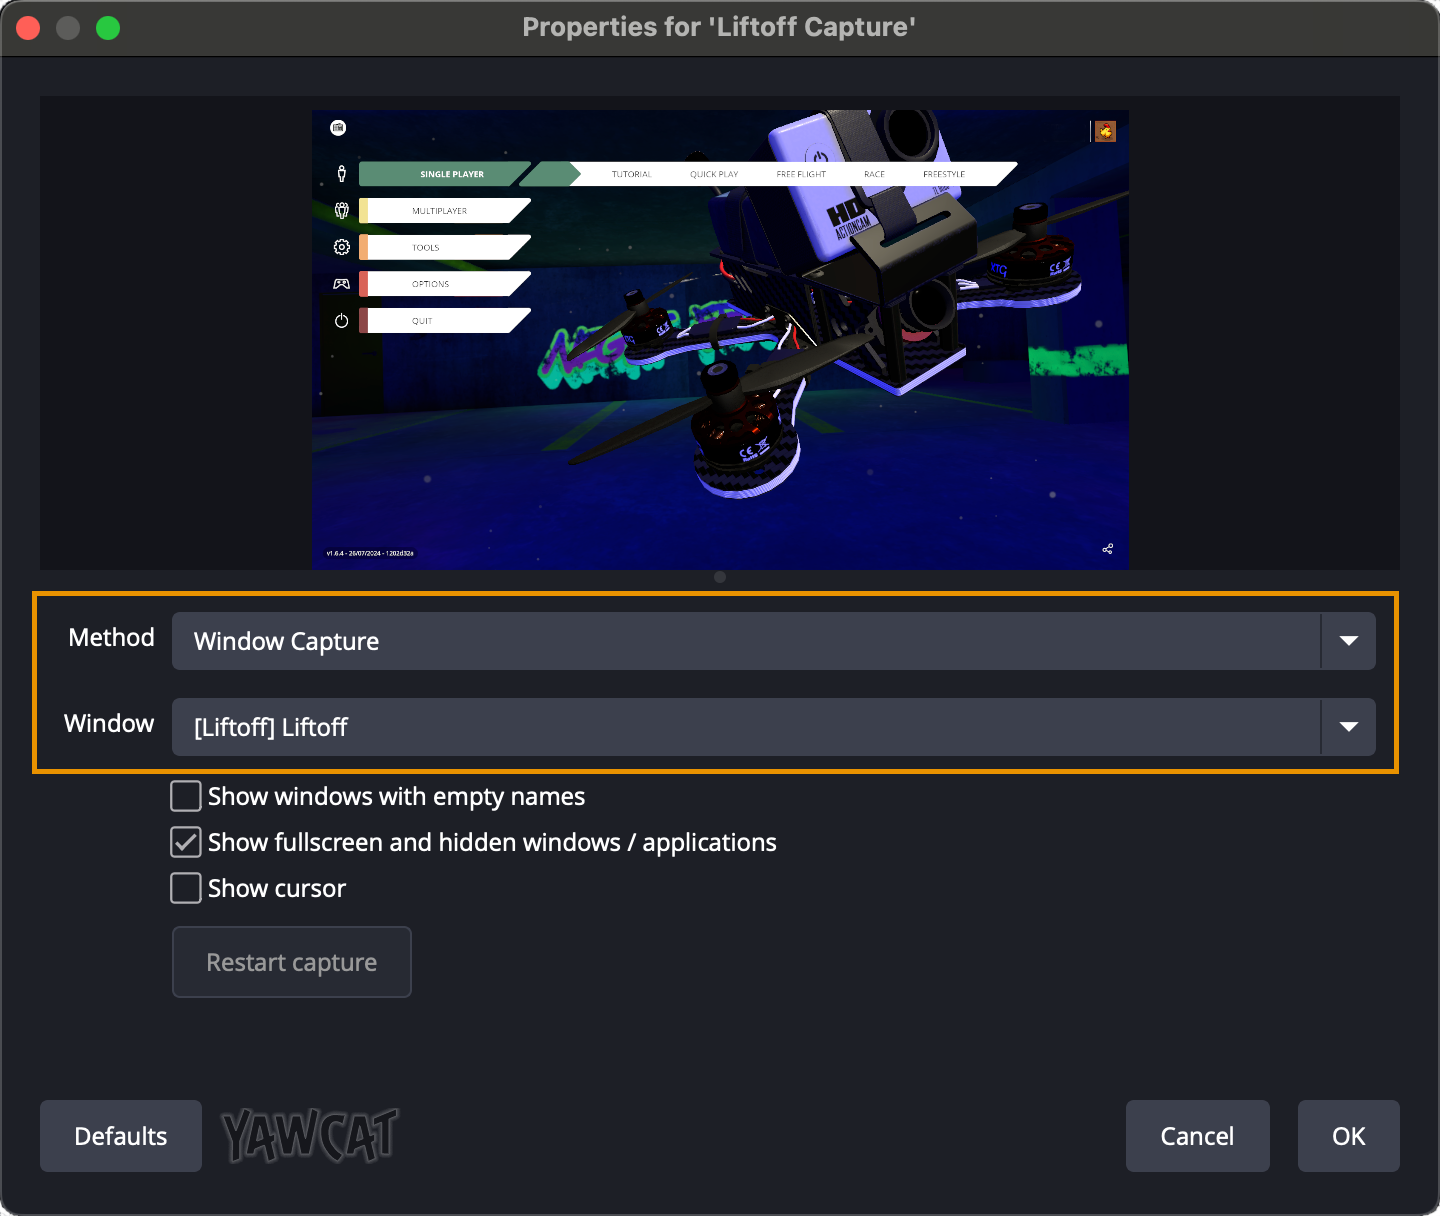
- Click 'macOS Screen Capture' in the menu
- Give the new source a name you'll remember, e.g.: 'Liftoff Capture'
- You'll have to launch Liftoff for the next part, once it's up an running use the Command + Tab shortcut to switch back to OBS.
- Click the Window dropdown and select [Liftoff], click 'OK' to save.


Start recording in Liftoff!
Now it's time for your hard work to pay off. I recommend launching Liftoff and selecting any race. Once the loading screen launches go ahead and get to recording with hotkeys:
To start recording:
- Windows: Control + Shift + Alt + F2
- Mac: Control + Alt + Command + F2
To stop recording:
- Windows: Control + Shift + Alt + F3
- Mac: Control + Alt + Command + F3
Once you finish the race just navigate to the file path you selected during OBS setup and get to studying!
If this guide or setup helped you out or you have any feedback, let me know in the comments.

